
dmesg /var/log/message清除方法
Posted on: 2024-09-06 10:47:49 visited: 434手动修改了/var/log/messages 中的内容会导致/var/log/messages 不再产生新的日志。
清空message文件的方法有多种,最简单的方法是使用命令行工具进行清空。在终端中输入以下命令:
sudo truncate -s 0 /var/log/message
使用dmesg -C对dmesg日志进行清除。
C盘空间不足清理的方法与步骤
Posted on: 2024-07-17 15:21:59 visited: 3951:安装cygwin环境,以方便使用Linux系统的工具。
2:查找大文件
$ find -type f -size +100M
./Program Files/Common Files/microsoft shared/OFFICE15/MSORES.DLL
./Program Files/Google/Chrome/Application/88.0.4324.190/chrome.dll
3:文件一致性查重,查找里面的大文件,确认文件不需要的可以删除。
/cygdrive/c/Users/xxx/AppData/Local/Microsoft/Windows/INetCache/Content.MSO
$ md5sum * | grep d298
d298a924988d232790049d533cd58a7f *11710868.gz
d298a924988d232790049d533cd58a7f *11C004F4.gz
d298a924988d232790049d533cd58a7f *16F8B058.gz
__DATE__和__TIME__使用注意事项
Posted on: 2023-12-28 15:53:44 visited: 5961: 时间没有更新:需要先clean,再进行编译
2:时间不是当前带时区的系统时间。是没有加时区的时间。
时间类型和时间函数
Posted on: 2023-11-16 09:28:10 visited: 669Unix时间戳(Unix timestamp),或称Unix时间(Unix time)、POSIX时间(POSIX time),是一种时间表示方式,定义为从格林威治时间1970年01月01日00时00分00秒起至现在的总秒数。Unix时间戳不仅被使用在Unix 系统、类Unix系统中,也在许多其他操作系统中被广告采用。
目前相当一部分操作系统使用32位二进制数字表示时间。此类系统的Unix时间戳最多可以使用到格林威治时间2038年01月19日03时14分07秒(二进制:01111111 11111111 11111111 11111111)。其后一秒,二进制数字会变为10000000 00000000 00000000 00000000,发生溢出错误,造成系统将时间误解为1901年12月13日20时45分52秒。这很可能会引起软件故障,甚至是系统瘫痪。
| struct tm { int tm_sec; /*秒,正常范围0-59, 但允许至61*/ int tm_min; /*分钟,0-59*/ int tm_hour; /*小时, 0-23*/ int tm_mday; /*日,即一个月中的第几天,1-31*/ int tm_mon; /*月, 从一月算起,0-11*/ 1+p->tm_mon; int tm_year; /*年, 从1900至今已经多少年*/ 1900+ p->tm_year; int tm_wday; /*星期,一周中的第几天, 从星期日算起,0-6*/ int tm_yday; /*从今年1月1日到目前的天数,范围0-365*/ int tm_isdst; /*日光节约时间的旗标*/ }; |
| windows | GetTickCount | GetTickCount是一种函数。GetTickCount返回(retrieve)从操作系统启动所经过(elapsed)的毫秒数,它的返回值是DWORD。 |
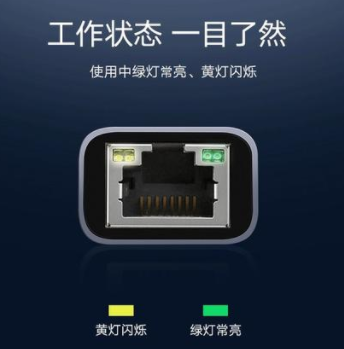
RJ45网口两个LED灯的指示意义以及控制原理
Posted on: 2020-12-23 21:50:51 visited: 11950一般RJ45网口会有两个LED灯,至少从外观上看是两个。一个是link灯,一个是ACT灯。
参考下图所示,缺口朝上,一般右边绿灯常亮,表示link上,左边黄色、橘色、或者绿色灯闪烁,表示有数据传输。
有些act灯实际可能有多个是个多色灯,比如黄色、绿色。当100M时闪绿灯,当千兆时闪黄灯,以做区分。
这些灯是有PHY进行控制的。PHY的硬件接口文档中会有说明,以及相关的寄存器设置。
在uboot中可以使用mii来修改寄存器,改变亮灯状态。
在linux系统下,可以使用内核、驱动或者mii-tools修改控制灯的状态。
这些如何操作需要参考具体的硬件手册,因硬件手册厂家一般是不公开的,但从网上也能够找到零星的资料。
以下能够查找到的网上公开资料,可供参考


ipmitool命令与raw命令与ipmi spec对照表3-NETFN_APP
Posted on: 2021-02-25 21:07:40 visited: 11396ipmitool命令与raw命令与ipmi spec对照表3-NETFN_APP
| raw命令索引 | 对应IPMI Spec的章节 | raw命令格式 | 字符串命令 |
|---|---|---|---|
| ipmitool raw 0x06 0x01 | Get Device ID(20.1) | ||
| ipmitool raw 0x06 0x02 | Cold Reset(20.2) | ipmitool raw 0x06 0x02 | ipmitool mc reset cold |
| ipmitool raw 0x06 0x03 | Warm reset | ipmitool raw 0x06 0x03 | ipmitool mc reset warm |
| ipmitool raw 0x06 0x04 | Get Self Test Results(20.4) | ipmitool raw 0x06 0x04 | ipmitool mc selftest |
| ipmitool raw 0x06 0x05 | Manufacturing Test On(20.5) | ipmitool raw 0x06 0x05 | |
| ipmitool raw 0x06 0x06 | Set ACPI Power State(20.6) | ipmitool raw 0x06 0x06 Data[1:2] | |
| ipmitool raw 0x06 0x07 | Get ACPI Power State(20.7) | ipmitool raw 0x06 0x07 | |
| ipmitool raw 0x06 0x08 | Get Device GUID(20.8) | ipmitool raw 0x06 0x08 | |
| ipmitool raw 0x06 0x09 | Get NetFn Support(21.2) | ipmitool raw 0x06 0x09 Data[1] | |
| ipmitool raw 0x06 0x0A | Get Command Support(21.3) | ipmitool raw 0x06 0x0a Data[1:3] | |
| ipmitool raw 0x06 0x0B | Get Command Sub-function Support(21.4) | ipmitool raw 0x06 0x0b Data[1:4] | |
| ipmitool raw 0x06 0x0C | Get Configurable Commands(21.5) | ipmitool raw 0x06 0x0c Data[1:3] | |
| ipmitool raw 0x06 0x0D | Get Configurable Command Sub-functions(21.6) | ipmitool raw 0x06 0x0d Data[1:4] | |
| ipmitool raw 0x06 0x61 | Get Command Enables(21.8) | ||
| ipmitool raw 0x06 0x64 | Get OEM NetFn IANA Support(21.11) | ||
| ipmitool raw 0x06 0x22 | Reset Watchdog Timer(27.5) | ipmitool raw 0x06 0x22 | ipmitool mc watchdog reset |
| ipmitool raw 0x06 0x24 | Set Watchdog Timer(27.6) | ipmitool raw 0x06 0x24 Data[1:6] | ipmitool mc watchdog off |
| ipmitool raw 0x06 0x25 | Get Watchdog Timer(27.7) | ipmitool raw 0x06 0x25 | ipmitool mc watchdog get |
| ipmitool raw 0x06 0x2E | Set BMC Global Enables(22.1) | ipmitool raw 0x06 0x2e Data[1] | ipmitool mc setenables |
| ipmitool raw 0x06 0x2F | Get BMC Global Enables(22.2) | ipmitool raw 0x06 0x2f | ipmitool mc getenables |
| ipmitool raw 0x06 0x30 | Clear Message Flags(22.3) | ipmitool raw 0x06 0x30 Data[1] | |
| ipmitool raw 0x06 0x31 | Get Message Flags(22.4) | ipmitool raw 0x06 0x31 | |
| ipmitool raw 0x06 0x32 | Enable Message Channel Receive(22.5) | ipmitool raw 0x06 0x32 Data[1:2] | |
| ipmitool raw 0x06 0x33 | Get Message(22.6) | ||
| ipmitool raw 0x06 0x34 | Send Message(22.7) | ||
| ipmitool raw 0x06 0x35 | Read Event Message Buffer(22.8) | ipmitool raw 0x06 0x35 | |
| ipmitool raw 0x06 0x36 | Get BT Interface Capabilities(22.1) | ||
| ipmitool raw 0x06 0x37 | Get System GUID(22.14) | ||
| ipmitool raw 0x06 0x58 | Set System Info Parameters(22.14a) | ||
| ipmitool raw 0x06 0x59 | Get System Info Parameters(22.14b) | ||
| ipmitool raw 0x06 0x38 | Get Channel Authentication Capabilities(22.13) | ||
| ipmitool raw 0x06 0x39 | Get Session Challenge(22.15) | ||
| ipmitool raw 0x06 0x3A | Activate Session(22.17) | ||
| ipmitool raw 0x06 0x3B | Set Session Privilege Level(22.18) | ||
| ipmitool raw 0x06 0x3C | Close Session(22.19) | ||
| ipmitool raw 0x06 0x3D | Get Session Info(22.2) | ||
| ipmitool raw 0x06 0x3F | Get AuthCode(22.21) | ||
| ipmitool raw 0x06 0x40 | Set Channel Access(22.22) | ||
| ipmitool raw 0x06 0x41 | Get Channel Access(22.23) | ||
| ipmitool raw 0x06 0x42 | Get Channel Info Command(22.24) | ||
| ipmitool raw 0x06 0x43 | Set User Access Command(22.26) | ||
| ipmitool raw 0x06 0x44 | Get User Access Command(22.27) | ||
| ipmitool raw 0x06 0x45 | Set User Name(22.28) | ||
| ipmitool raw 0x06 0x46 | Get User Name Command(22.29) | ||
| ipmitool raw 0x06 0x47 | Set User Password Command(22.3) | ||
| ipmitool raw 0x06 0x48 | Activate Payload(24.1) | ipmitool raw 0x06 0x48 Data[1:6] | |
| ipmitool raw 0x06 0x49 | Deactivate Payload(24.2) | ipmitool raw 0x06 0x49 Data[1:6] | |
| ipmitool raw 0x06 0x4A | Get Payload Activation Status(24.4) | ||
| ipmitool raw 0x06 0x4B | Get Payload Instance Info(24.5) | ||
| ipmitool raw 0x06 0x4C | Set User Payload Access(24.6) | ||
| ipmitool raw 0x06 0x4D | Get User Payload Access(24.7) | ||
| ipmitool raw 0x06 0x4E | Get Channel Payload Support(24.8) | ||
| ipmitool raw 0x06 0x4F | Get Channel Payload Version(24.9) | ||
| ipmitool raw 0x06 0x50 | Get Channel OEM Payload Info(24.1) | ||
| ipmitool raw 0x06 0x52 | Master Write-Read(22.11) | ||
| ipmitool raw 0x06 0x54 | Get Channel Cipher Suites(22.15) | ||
| ipmitool raw 0x06 0x55 | Suspend/Resume Payload Encryption(24.3) | ||
| ipmitool raw 0x06 0x56 | Set Channel Security Keys(22.25) | ||
| ipmitool raw 0x06 0x57 | Get System Interface Capabilities(22.9) | ipmitool raw 0x06 0x57 Data[1] |
LSI 3008的IT与IR模式的区别
Posted on: 2020-07-06 10:33:39 visited: 6614本文综合baidu与bing返回结果。
https://www.supermicro.org.cn/support/faqs/faq.cfm?faq=16169
Question:
For LSI Host Bus Adapter (HBA) firmware, what is the difference between IT mode and IR mode?
对于LSI主机总线适配器(HBA)固件,IT模式与IR模式有何区别?
Answer:
The two firmware types are Initiator Target (IT) and Integrated RAID (IR). IR is the typical hardware RAID firmware that the internal cards or boards ship with.
The IT firmware, on the other hand, is the Initiator Target firmware which is designed to allow a SAS HBA to connect to up to 256 devices using SAS Expanders. The IT firmware is typically shipped on external cards. The IT firmware does not have any RAID capabilities and simply acts as an HBA.
这两种固件类型是启动器目标(IT)和集成RAID(IR)。
IR是内部卡或板附带的典型硬件RAID固件。
IT固件允许SAS HBA使用SAS扩展器连接到多达256个设备。IT固件通常在外部卡上提供。IT固件没有任何RAID功能,只是充当HBA。
LSI SAS3008是常用的RAID卡种类。此RIAD卡有两种固件:IT和IR。
当固件是3008IT时,只能直连硬盘而不能配置RAID。
当固件是3008IR时,可以配置RAID。
Basicly the IT firmware is only just a HBA and the boot up time is quick. The IR firmware is the raid software firmware so boot up is a bit longer than having the IT firmware only. You can cross flash with the LSI firmware in IT mode only or IT and IR mode which is default in LSI. If you are going with pure software raid then the IT firmware is best.
更多解释:
ipmitool命令与raw命令与ipmi spec对照表2-NETFN_SENSOR
Posted on: 2021-02-25 17:04:13 visited: 6592ipmitool命令与raw命令与ipmi spec对照表2-NETFN_SENSOR
| raw命令索引 | 对应IPMI Spec的章节 | raw命令格式 | 字符串命令 |
|---|---|---|---|
| ipmitool raw 0x04 0x00 | Set Event Receiver(29.1) | ipmitool raw 0x04 0x00 Data[1:2] | |
| ipmitool raw 0x04 0x01 | Get Event Receiver(29.2) | ipmitool raw 0x04 0x01 | |
| ipmitool raw 0x04 0x02 | Platform Event(29.3) | ipmitool raw 0x04 0x02 Data[1:7] | ipmitool event [event_dir] ipmitool event 1 ipmitool event 2 ipmitool event 3 |
| ipmitool raw 0x04 0x10 | Get PEF Capabilities(30.1) | ipmitool raw 0x04 0x10 | ipmitool pef ipmitool pef info |
| ipmitool raw 0x04 0x11 | Arm PEF Postpone Timer(30.2) | ipmitool raw 0x04 0x11 Data[1] | |
| ipmitool raw 0x04 0x12 | Set PEF Configuration Parameters(30.3) | ipmitool raw 0x04 0x12 Data[1:N] | |
| ipmitool raw 0x04 0x13 | Get PEF Configuration Parameters(30.4) | ipmitool raw 0x04 0x13 Data[1:3] | ipmitool pef list |
| ipmitool raw 0x04 0x14 | Set Last Processed Event ID(30.5) | ipmitool raw 0x04 0x14 Data[1:3] | |
| ipmitool raw 0x04 0x15 | Get Last Processed Event ID(30.6) | ipmitool raw 0x04 0x15 | ipmitool pef status |
| ipmitool raw 0x04 0x16 | Alert Immediate(30.7) | ipmitool raw 0x04 0x16 Data[1:3] | |
| ipmitool raw 0x04 0x17 | PET Acknowledge(30.8) | ||
| ipmitool raw 0x04 0x20 | Get Device SDR Info(35.2) | ||
| ipmitool raw 0x04 0x21 | Get Device SDR(35.3) | ||
| ipmitool raw 0x04 0x22 | Reserve Device SDR Repository(35.4) | ||
| ipmitool raw 0x04 0x23 | Get Sensor Reading Factors(35.5) | ||
| ipmitool raw 0x04 0x24 | Set Sensor Hysteresis(35.6) | ||
| ipmitool raw 0x04 0x25 | Get Sensor Hysteresis(35.7) | ||
| ipmitool raw 0x04 0x26 | Set Sensor Threshold(35.8) | ||
| ipmitool raw 0x04 0x27 | Get Sensor Threshold(35.9) | ||
| ipmitool raw 0x04 0x28 | Set Sensor Event Enable(35.1) | ||
| ipmitool raw 0x04 0x29 | Get Sensor Event Enable(35.11) | ||
| ipmitool raw 0x04 0x2A | Re-arm Sensor Events(35.12) | ||
| ipmitool raw 0x04 0x2B | Get Sensor Event Status(35.13) | ||
| ipmitool raw 0x04 0x2D | Get Sensor Reading(35.14) | ||
| ipmitool raw 0x04 0x2E | Set Sensor Type(35.15) | ||
| ipmitool raw 0x04 0x2F | Get Sensor Type(35.16) | ||
| ipmitool raw 0x04 0x30 | Set Sensor Reading And Event Status(35.17) |
参考IPMI Spec中的部分Appendix G。

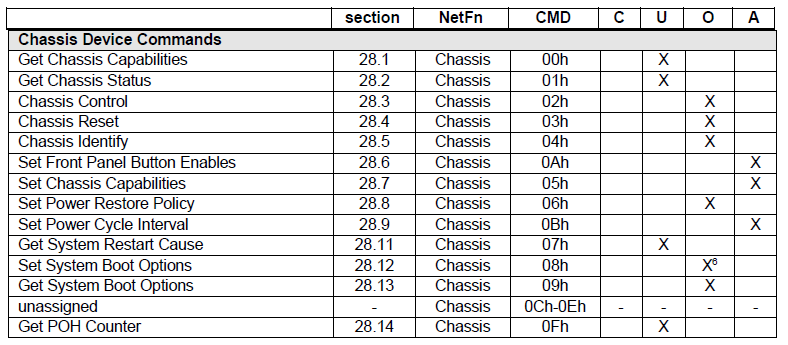
ipmitool命令与raw命令与ipmi spec对照表1-NETFN_CHASSIS
Posted on: 2021-02-25 11:39:34 visited: 6167ipmitool命令与raw命令与ipmi spec对照表1-NETFN_CHASSIS
| raw命令索引 | 对应IPMI Spec的章节 | raw命令格式 | 字符串命令 |
|---|---|---|---|
| ipmitool raw 0x00 0x00 | Get Chassis Capabilities(28.1) | ipmitool raw 0x00 0x00 | |
| ipmitool raw 0x00 0x01 | Get Chassis Status(28.2) | ipmitool raw 0x00 0x01 | ipmitool raw 0x00 0x01 ipmitool chassis status ipmitool power status ipmitool chassis power status ipmitool chassis poh |
| ipmitool raw 0x00 0x02 | Chassis Control(28.3) | ipmitool raw 0x00 0x02 0x00 | ipmitool chassis power off ipmitool power off |
| ipmitool raw 0x00 0x04 | Chassis Identify(28.5) | ipmitool raw 0x00 0x04 [Data[1:2]] | ipmitool chassis identify |
| ipmitool raw 0x00 0x0A | Set Front Panel Button Enables(28.6) | ipmitool raw 0x00 0x0a Data[1] | |
| ipmitool raw 0x00 0x05 | Set Chassis Capabilities(28.7) | ipmitool raw 0x00 0x05 Data[1:6] | |
| ipmitool raw 0x00 0x06 | Set Power Restore Policy(28.8) | ipmitool raw 0x00 0x06 Data[1] | ipmitool chassis policy |
| ipmitool raw 0x00 0x0B | Set Power Cycle Interval(28.9) | ipmitool raw 0x00 0x0b Data[1] | |
| ipmitool raw 0x00 0x07 | Get System Restart Cause(28.11) | ipmitool raw 0x00 0x07 | ipmitool chassis restart_cause |
| ipmitool raw 0x00 0x08 | Set System Boot Options(28.12) | ipmitool raw 0x00 0x08 Data[1:6] | ipmitool chassis bootdev ipmitool chassis bootparam set bootflag |
| ipmitool raw 0x00 0x09 | Get System Boot Options(28.13) | ipmitool raw 0x00 0x09 Data[1:3] | ipmitool chassis bootparam get 0x05 |
| ipmitool raw 0x00 0x0F | Get POH Counter(28.14) | ipmitool raw 0x00 0x0F | ipmitool chassis poh |
参考IPMI Spec中的部分Appendix G。

uboot下的mii命令简介
Posted on: 2020-12-24 08:45:05 visited: 5179uboot下有一个mii命令。命令帮助信息如下:
mii - MII utility commands

Usage:
mii device                     - list available devices
mii device            - set current device
mii info                 - display MII PHY info
mii read            - read  MII PHY  register
mii write     - write MII PHY  register
mii dump            - pretty-print   (0-5 only)
Addr and/or reg may be ranges, e.g. 2-7.
mii device示例,会输出MDC/MDIO总线设备
uboot>mii device
MII devices: 'FSL_MDIO0' 'FM_TGEC_MDIO'
Current device: 'FSL_MDIO0'
mii info打印输出,PHY后面跟的就是addr
uboot> mii info
PHY 0x00: OUI = 0x5043, Model = 0x1D, Rev = 0x01, 1000baseT, FDX
PHY 0x01: OUI = 0x0000, Model = 0x00, Rev = 0x00,  10baseT, HDX
PHY 0x02: OUI = 0x0000, Model = 0x00, Rev = 0x00,  10baseT, HDX
PHY 0x03: OUI = 0x0000, Model = 0x00, Rev = 0x00,  10baseT, HDX
PHY 0x04: OUI = 0x0000, Model = 0x00, Rev = 0x00,  10baseT, HDX
PHY 0x05: OUI = 0x0000, Model = 0x00, Rev = 0x00,  10baseT, HDX
PHY 0x06: OUI = 0x0000, Model = 0x00, Rev = 0x00,  10baseT, HDX
PHY 0x07: OUI = 0x0000, Model = 0x00, Rev = 0x00,  10baseT, HDX
mii read - read MII PHY register
mii write - write MII PHY register
上述两个命令,需要根据具体的芯片手册寄存器设置来进行配置。以下命令为示例
mii write 0 0 0x8000 向地址为0的phy芯片的0寄存器写入0x8000
mii read 0 0 读取地址为0的phy芯片的寄存器0的值